Pages

Monday, 24 February 2014

Earl Grey Tea Loaf


As you can probably tell, I love tea! I believe that tea is a suitable drink at any time of day and has the ability to help out in any mood or situation, whether it be as a morning wake-up, as a way to unwind at the end of the day, as a soothing balm when sick, or as a reviving drink to perk up our spirits when everything is getting a bit out of hand. And with such a wide range of flavours and varieties available, a perfect match can always be found!

Mr Duckie is, of course, even more of a tea fiend than I am. One of our favourite teas is Earl Grey, a very elegant and distinctive black tea. I love the delicate citrus flavour and floral aroma that comes from the bergamot oil flavouring. Traditionally it is served with a slice of lemon, making it a very light and refreshing alternative to regular black tea, although I must admit that I like it with milk as well!

Earl Grey tea lends itself very well to all sorts of baking - in fact one of the flavours in our wedding cake (made by the very talented Sharon Wee) was a chocolate cake with Earl Grey tea and cookies ganache! 


A slice of our very yummy wedding cake, filled with Earl Grey flavoured ganache

So, I was curious as to how Earl Grey tea would taste inside a cake itself. My aim was to make a light and fluffy loaf cake, studded with sultanas in the style of an old-fashioned fruit loaf, the kind that is the perfect accompaniment to a cup of afternoon tea. The recipe I first used was based on a Yorkshire Gold tea loaf recipe that I picked up from the supermarket Waitrose when I was living in London.

I used an Earl Grey tea containing lemon and orange peel, as well as blue cornflower petals, and which looked very pretty indeed!


I had high hopes for my first attempt. The preparation process itself was a lot of fun, with wafts of tea floating around as I mixed the ingredients together. Unfortunately, the cake did not turn out as well as I had hoped - mostly due to my not following the recipe and making my own adjustments. First, I had used a loaf tin that was too big, so my cake was rather flat and looked more like a slice...


So flat :(
When I cut it open, rather than a soft fluffy cake, I had a very dense cake - most likely I had added too many wet ingredients to dry ingredients. I could hardly even see the sultanas, as they appeared to merge with the cake itself...


Most disappointing of all, the Earl Grey flavour was also hard to detect. I had added an orange icing, thinking that the orange would match the citrus citrus notes in the tea, but unfortunately the flavour was too overpowering! Mr Duckie, ever supportive, insisted that it was still a nice cake, but I wasn't convinced. Overall, it was a pleasant tasting cake, but the tea flavour just did not shine through strong enough, and I didn't have the soft, fluffy cake that I was aiming for.

But I wasn't about to give up on my tea flavoured cake quest!

For my second attempt, I added more flour, and some extra raising agents for extra lift, and I reduced the wet ingredients to prevent the cake from being too dense. I also used a lemon syrup instead of an orange
icing. Finally, I added a tablespoon full of vinegar - this sounds strange but I have used it in another trustworthy eggless cake recipe in the past, and I found that it helps to keep the cake light when you aren't using any eggs. 

I eagerly awaited the outcome of this second cake. And, much to my excitement, I had a proper fluffy loaf cake!


The cake looked so pretty with the tiny brown flecks of tea leaves throughout it. It had a nice soft, crumbly texture, with sweetness from the juicy sultanas studded throughout the cake.


And most importantly, it tasted like Earl Grey tea! Best of all, as the sultanas had been soaked in the tea, they tasted like tiny bursts of tea in each bite!

So, what is your favourite hot drink? And of course, do feel free to experiment with your own favourite tea to make your own very special tea cake!

Earl Grey Tea Loaf

Adapted from recipes here and here

Loaf
3 Earl Grey tea bags
1 cup boiling water
150 g sultanas
300 g self-raising flour
2 tsp baking powder
½ tsp baking soda
Pinch of salt
1 tsp mixed spice
100g raw sugar
½ cup rice-bran oil
¼ cup soy milk
1 tbsp vinegar

Lemon glaze
50 g caster sugar
100ml water
2 tbsp lemon juice
1 tsp finely grated lemon zest

1. Cut open the teabags and empty leaves into a bowl. Add the boiling water and brew for 5 minutes. Add the sultanas and soak for at least 1 hour.


2. Preheat oven to 180 degrees. Line and grease a loaf tin (my dimensions were approx. 21 cm x 10.5 cm x 7 cm) .
3. Sift the flour, baking powder, baking soda, salt and mixed spice into a large bowl. Add the sugar and stir to combine. Make a well in the middle. Add the fruit and tea mixture (including all the tea leaves and the soaking liquid), oil and soy milk and stir gently to combine. Then add the vinegar and stir to combine.


4. Spoon batter into loaf tin. Bake for 45-50 minutes or until a skewer inserted into the middle of the cake comes out clean.
5. To make glaze, put the water, juice and zest into a small pan and gently bring to the boil. Add the caster sugar, give a quick stir, and bring back to the boil. Boil on a medium heat for about 5-10 minutes until thickened slightly and syrup is a golden colour.


6. Once cake is out of the oven, prick the cake all over with a skewer then brush syrup all over the top of the cake. How much syrup you use is up to you and how sweet you like your cake – I only used about half the syrup and I kept the rest to serve on the side (or as for Mr Duckie, with some vanilla ice-cream as a makeshift lemon sundae!). Leave to cool in the tin.


7. Once cool, slice and serve with any left over syrup, and of course, a cup of your favourite tea!


Monday, 17 February 2014

Romantic "Cherry Bakewell" cupcakes


It sure has been a topsy turvy week! Between moving house and attending significant events with friends and family, I unfortunately haven't had much time to write much. I did however manage to squeeze in some baking!

I made these cupcakes as a Valentines Day present for Mr Duckie. This Valentines was particularly special as it was out first one as a married couple :) Having had such a busy week, we wished only to have a quiet evening in our new home, and I thought that there could be no better way of settling in and celebrating love than with some home-made baked goods.

Mr Duckie, true to his British roots, is a huge fan of all the Mr Kipling cakes and tarts. His hands down favourites though are the Cherry Bakewells - those delicious tarts with a jammy base, sticky white fondant icing, and a bright red glace cherry in the centre. These were a common treat for us when we lived in London (much to Mr Duckie's pleasure!), as they were so easily and cheaply available. However, these tasty tarts are harder to find in Australia, so I thought that I would make my own version.


My aim was to make cherry and almond cupcakes to reflect the soft and fruity Bakewell filling, and then to top with a rosewater icing and glace cherries. The cake batter was easy to put together, only requiring some mixing and folding. I had some misgivings as I filled the cases and saw that they were rather full, but the recipe warned that this would happen so I kept on going. Everything was going smoothly, until I went to take the cupcakes out and saw that they had spilled over the edges and had sunk in the middle! And whilst the tops were getting golden brown, the inside was still not cooked! Clearly I had put too much batter into the cases...

Oh no...overflowing cakes!

With some post-baking reconstruction, whereby I trimmed the edges and filled the holes the excess cake...


And carefully covered with icing (so useful for hiding mistakes!), I had some not too bad looking cakes...


Luckily Mr Duckie did not notice anything was wrong, and ate his cupcake wholeheartedly and with much satisfaction! The cupcakes were very moist from the almond meal and yoghurt, with a fruity hit from the cherries and a nutty crunch from the toasted nuts. The floral fragrance from the rosewater icing was also a nice complement to the cherry and almond flavours of the cake. Next time though I will definitely be more careful when filling the cupcake cases!


Overall, it was a very cosy and relaxing Valentines Day, and a perfect end to the week!


Romantic "Cherry Bakewell" Cupcakes

Adapted from recipes from BBC Good Food and Delia Online

Ingredients

Cupcakes
150 ml natural yoghurt
3 eggs, beaten
1 tsp vanilla extract
1 tsp almond extract (this only gave a very subtle flavour, so feel free to add more if prefer a stronger almond flavour)
175g caster sugar
160g self-raising flour
1 tsp baking powder 
75g ground almonds
200g glace cherries, quartered (put some aside for decorating the cupcakes)
50g slivered almonds, toasted (I used a mixture of pinenuts and almonds which were on special at the supermarket)
3/4 cup canola oil

Icing
250g icing sugar, sifted
1 tbsp rosewater (if you like you could use lemon juice instead)
1-2 tbsp water

To toast slivered almonds: Preheat oven to 180 degrees. Line a baking tray with baking paper and sprinkle nuts over tray. Bake in oven for about 6-8 minutes until nuts are golden brown - be careful to keep an eye on the nuts to prevent them burning.

For cupcakes: line a 12-hole muffin tin with paper cases and heat oven to 190 degrees/fan 170 degrees fan. In a jug, mix the yoghurt, eggs, vanilla extract and almond extract. Put the sugar, flour, baking powder and ground almonds, plus a pinch of salt, into a large bowl. Mix well and make a well in the middle.

Add the yoghurty mix and oil to the dry ingredients. Quickly fold in with a spatula, metal spoon or wooden spoon - don't overwork it. Spoon into cases so that they are about two-thirds full (you will most likely have leftover batter, which you can bake in another batch, or in another muffin tin if you have one). Bake for 20-25 mins or until golden, risen and springy to the touch. Cool for a few minutes, then lift cakes onto a wire rack to cool completely.

For the icing: combine icing sugar, rosewater and water (add 1 or 2 tablespoons depending on how thick you want your icing) in a bowl until a smooth paste forms.

Once cakes are cool, spread icing over and decorate with half a glace cherry. Keep in an airtight container for up to 3 days or freeze as soon as possible.

Sunday, 2 February 2014

Beetroot, chia, and chocolate brownies


My husband, Mr Duckie, often travels for work. To help keep him going through the week, and as a little reminder of home, I like to bake some sweet treats that he can take with him.

Brownies, especially very gooey fudgey brownies, are one of Mr Duckie's favourite sweet treats. In my search for some healthier alternatives, I came across these beetroot brownies. I loved the idea of adding beetroot to cake - much like carrot cake, the beetroot adds moisture and sweetness, as well as a deep richness to the colour. The original recipe called for fresh, baked beetroot, however I decided to use tinned beetroot for convenience. Beetroot also happens to be one of Mr Duckie's favourite vegetables, so I thought why not try it in cake form!

The original recipe contained only 100 grams of chocolate, however, when Mr Duckie saw this he demanded, "More chocolate!". So I obliged by adding in some extra chocolate chunks. You can of course leave out these chocolate chunks if you feel that it is too much chocolate for you.

I also replaced eggs with chia seeds. Chia seeds make a very good, easy-to-use, egg alternative - when combined with water, they form a thick gel with the same consistency of egg. Chia seeds are of course also a popular "superfood", being high in fibre, protein, as well as in omega 3 fatty acids, calcium and iron, so they can be a nutritious addition to your baking. These brownies do contain butter, but feel free to use a non-dairy spread as an alternative if you wish to make these dairy-free (and also make sure that your chocolate does not contain any dairy).


Overall, these brownies were fairly straightfoward to make, requiring only some blending, melting and mixing. Thanks to the beetroot, the brownies were very soft, smooth, gooey and creamy , in spite of having only a small amount of butter. The chia seeds provided a slight nutty crunch throughout the brownie. The flavour was intensely chocolatey, complemented by the background earthiness of the beetroot . The fragrance from the orange zest also provided a lovely lift to the chocolate and beetroot. Luckily, these healthier brownies were a hit with Mr Duckie, and I hope you will enjoy them too!


Beetroot, chia and chocolate brownies

Adapted from a recipe from taste.com.au

Ingredients
250g tinned beetroot
100g dark chocolate, plus an extra 100g dark chocolate, chopped into small chunks
20g butter
2 tbsp chia seeds
1/2 cup water
1/2 tsp vanilla
1/4 cup plain flour
1/3 cup cocoa
1/2 cup brown sugar
1 orange, rind grated
Cocoa, for dusting

1. Soak the chia seeds in the water for 15 minutes, until the chia seeds have formed a gel.


2. Preheat oven to 180 degrees. Line an 18-20cm square cake pan with non-stick baking paper. Melt butter and 100g of the chocolate in a heatproof bowl over a saucepan of simmering water or in a microwave bowl in the microwave in 20 second bursts, stirring often until smooth. Set aside to cool slightly.


3. Chop the beetroot into chunks and place into a food processor with the chia seeds and vanilla. Blend into a smooth puree. Tip into a bowl.


4. Sift over flour and cocoa. Add sugar and stir until just combined. Stir in chocolate chunks and orange rind.


5. Pour mixture into the cake pan. Smooth the surface. Bake for 20 minutes or until the top is firm and crumbs cling to a skewer when inserted into the centre.


6. Cool completely in pan, then turn out onto a plate, dust with cocoa and cut into squares to serve.


Sesame and honey biscuits


What goes better with a cup of tea than a sweet biscuit for dunking? And with Chinese New Year having just passed, what more excuse is needed than to cook up some sweet treats to share with loved ones?

I made these biscuits to take to my friends Katie and Belinda, who threw an amazing Chinese New Year dinner celebration! It had been an extremely hot couple of days in Sydney, so very ingeniously, the girls arranged a DIY rice paper roll dinner. It was a deliciously fun dinner as we practised our rolling skills (some more successful than others!) and tried to eat our creations without spilling out all our carefully rolled fillings!

Lots of crisp, light and tasty ingredients, perfect for a cool dinner on a hot night!

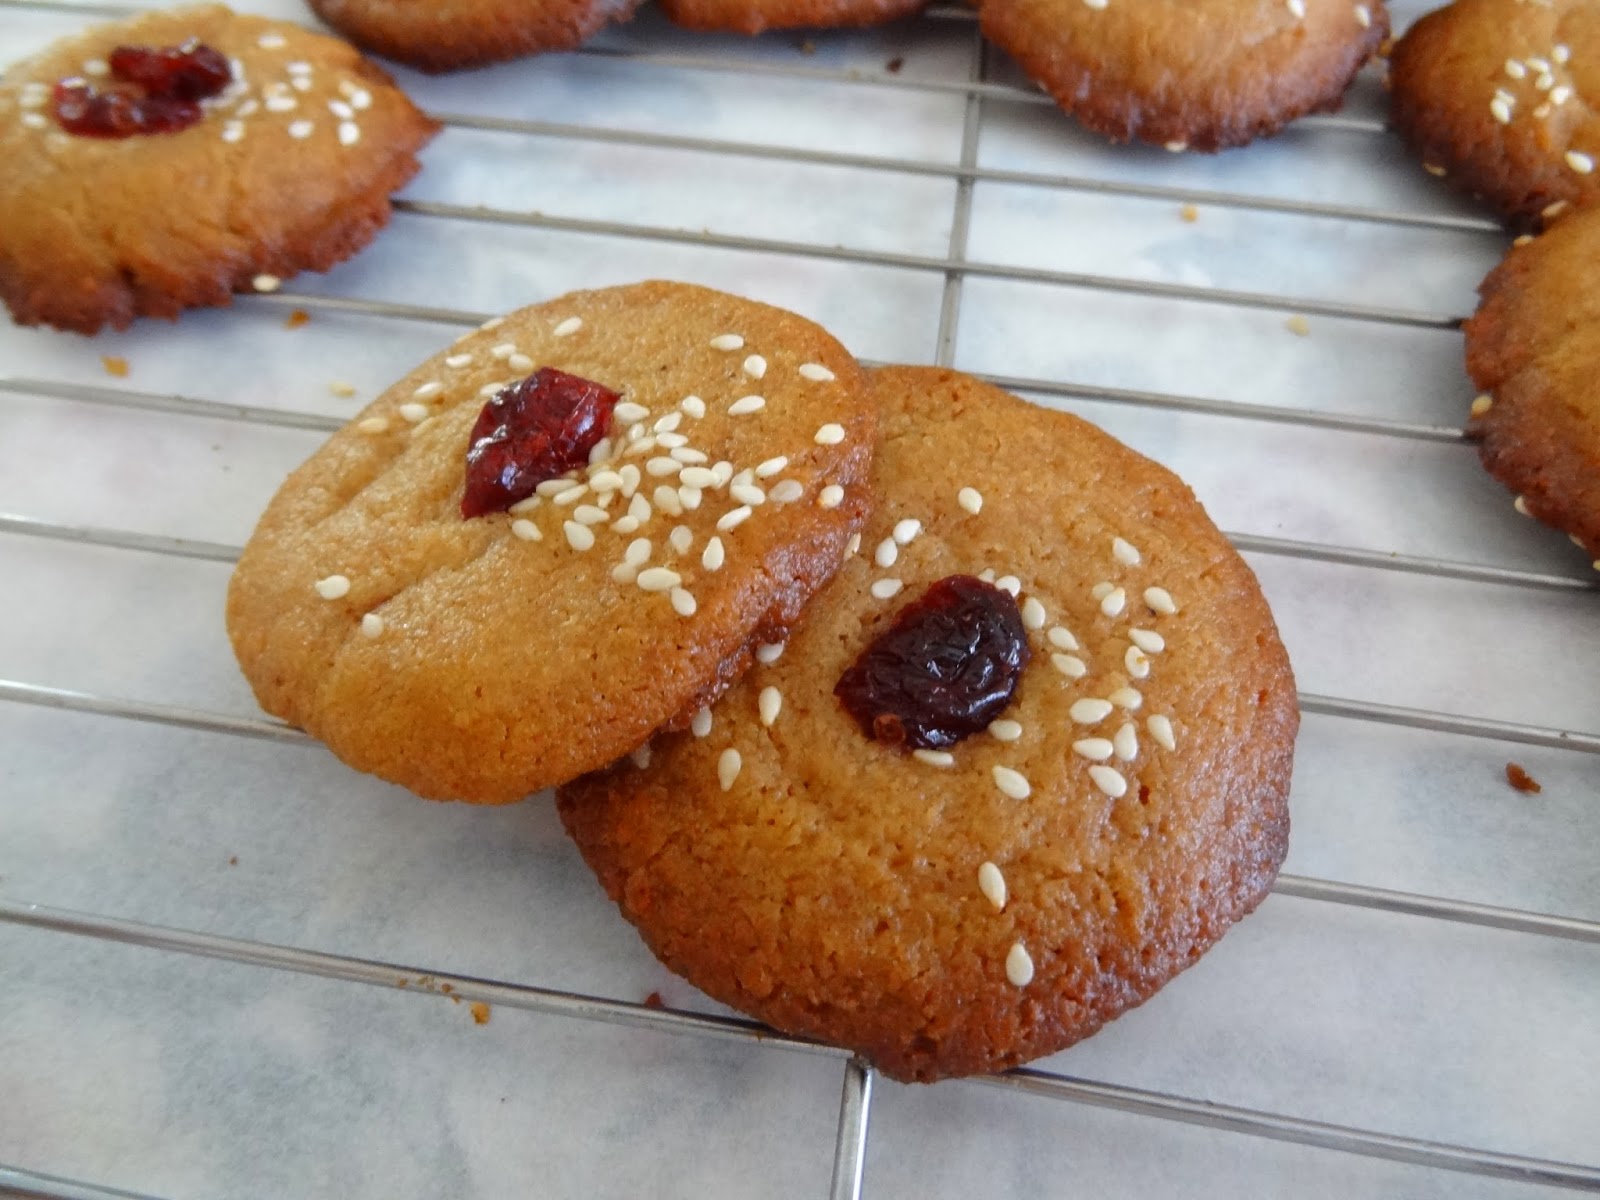
To add a lucky red touch, I decorated the biscuits with dried cranberries. The cranberries are quite a dark red, so if you prefer a more bright and shiny colour, glace cherries would be a nice alternative. I also intended the biscuits to be swirls, however, the swirls seemed to melt away after baking (the dough was quite soft, and probably more so due to the heat!). So it might be easier just to roll the dough into balls to avoid the extra swirling work. And be careful to keep an eye on the biscuits - sadly, some of mine burnt :(


The sesame flavour in these biscuits comes from tahini, a paste made from ground sesame seeds. Tahini is the perfect substitute for peanut nut butter for those who have nut allergies, as it has a similar consistency (if a bit runnier) and a similar nutty flavour. The tahini in these biscuits not only provides flavour but helps to hold the biscuit together. These biscuits are also egg-free and dairy-free, as well as being nut-free!

Of course, I couldn't resist trying one of the biscuits straight out of the oven. Whilst warm, the biscuits were crunchy on the outside, with a chewy, slightly gooey centre, and they tasted very moreish with the flavour of sesame. The cranberry added a fruity tanginess which was a nice surprise whilst eating the cookie. After they had cooled, the biscuits became firm and crunchy, and I believe they have sufficient sturdiness to withstand tea dunking!

Thank you so much to Katie and Belinda for holding a wonderful dinner - it was a lovely night, with great food and most importantly great company! I couldn't think of a better way to celebrate the new year!


Sesame and honey biscuits

Adapted from Super Food Ideas

Ingredients

2 teaspoons lemon juice
1/4 teaspoon bicarbonate of soda
1/2 cup caster sugar
1/4 cup honey
2/3 cup tahini
1 teaspoon finely grated lemon rind
1/4 cup canola oil
1 cup plain flour
1/2 teaspoon baking powder
1 teaspoon ground cinnamon
1/2 teaspoon ground mixed spice

To decorate:
1 tablespoon sesame seeds
1-2 tablespoons dried cranberries

Makes approx. 24 biscuits

1. Preheat oven to 180 degrees/160 degrees fan-forced. Line 2 baking trays with baking paper.
2. Combine lemon juice and bicarbonate of soda in a glass bowl (mixture will become foamy).


3. Add sugar, honey, tahini, lemon rind, and oil. Whisk together until mixture is just combined.


4. Sift flour, baking powder, cinnamon, and mixed spice over tahibi. Mix with a spoon until just combined.


5. Roll 1 teaspoon of mixture into logs and roll the log into a swirl (or roll into a ball and flatten slightly with a fork). Place on prepared trays, 4 cm apart. Sprinkle with sesame seeds and place a dried cranberry in the centre of the biscuit.


6. Bake for 12-15 minutes, swapping trays halfway during cooking, or until golden and cooked through. Stand on trays for 5 minutes. Cool on a wire rack. Serve.